Squash, cucumbers and Other Vines in Raised Beds

One benefit of having a website with a contact form is that I get a lot of feedback and questions. One question that has come up a few times is how to handle vining crops in raised beds. This is a good question because grown traditionally, a single acorn squash plant could take over an entire bed!

I grow vining crops of this sort in one of two ways, depending upon the crop.

Cucumbers, indeterminate tomatoes, sweet potatoes and small melons such as cantaloupe are planted on the North 1″ of the bed, and they are trained on trellises. This gives them maximum access to sunlight without shading other crops, plus leaves the rest of the South side of the bed free for other crops such as lettuce that don’t grow very tall. This allows ordinarily very space-consuming crops to take up a bare minimum of space while still being productive. As an added bonus, the effects of gravity give straighter cucumbers.

No support beyond the basic trellising is needed for tomatoes, cucumbers and sweet potatoes. But the smaller melons are another story! As they ripen, they’ll literally fall off the vine prematurely if unsupported. For this purpose, I use the leggings of old (but washed!) panty-hose. These are made of a stretchable material that will conform to fit the shape of melons without restricting their growth. Once melons get about 4″ in diameter, I tie the cut leggings to the trellising and run them under the melons so the melons are gently supported.

There are limits to this approach, however, because it is utterly impractical for larger melons, and some squash just seem to refuse to be trained. In the case of larger watermelons (“moon and stars” is one of my favorite varieties and it grows fine up north) and vining squash, I instead plant these in the Southern 1′ of the bed and let the vines grow out of the bed Southward toward the sun. I put landscape fabric and (untreated) mulch over the area where the vines will be running, and let them go. This likewise frees up the Northern 3′ of bed for other crops, and keeps the vines protected.

Summer squash and zucchini are bush-type squash plants and they take up a lot of space. I have found, however, that by planting them offset in a pattern similar to a checker board, I can fit eleven plants in a bed. I grow six yellow squash and five zucchini this way. If you have ever grown these, you are undoubtedly familiar with “zucchini surprise.” That is, all of a sudden, the plants just seem to explode and in no time flat you have bushels of zucchini. Yellow summer squash do the same thing. You’ll find that unless you are feeding an army, a single bed of these will be more than sufficient.

On the topic of cucurbits generally (which includes squash, cucumbers, watermelons and gourds), most folks recommend directly seeding these in the garden and watering them until they sprout. I disagree. I have found that starting these indoors a couple of weeks in advance (they sprout quickly) and then planting them out a week after last frost gives them a major head start in the garden for earlier productivity that makes them better able to produce. So I recommend starting these indoors, and then transplanting them. A lot of books say they don’t transplant well; but if they are treated gently they transplant just fine.

Letting Nature Tell you When to Plant

There is only so much that can be done using the calendar as a timetable for planting. By its very nature, this technique is very cautious so as to avoid frost damage to tender crops.

But nature doesn’t use a calendar. Instead, it uses very sophisticated methods for determining when seeds should sprout, including factors such as accumulated heat. Using nature as your guide, you are likely to get an extra couple of weeks out of the growing season.

The easiest way to do this is to use seeds for crops from the prior year as a guide. Some mustard seed undoubtedly was sown, and some tomatoes fell to the ground and remained over the winter. A couple of carrots were likely missed during harvest, as well as a couple of potatoes.

When greenery appears above the carrot left in the ground from last season, that is the time to plant your carrot, parsnip, and celery seeds. When last year’s potatoes are sending up sprouts from the ground, that is the time to sow your potatoes. When tomatoes start sprouting in the beds of their own accord, that is the time to transplant your tomato seedlings.

If one is a keen observer of nature, you will notice other signs as well. I know that when the petals fall off the flowers on the apple trees, it is time to plant the brassicas — broccoli, cabbage, etc. as well as onion sets. I know that when the asparagus stalks start branching out, it is time for me to plant out the lettuce.

Such observations are very local; so the observations that work for me won’t work for you. Just plant by the calendar and observe the natural phenomena occurring around that time or just prior; and make note of it in your journal. Soon, you will be able to add a couple of weeks to your gardening season without fear of damaged plants just by following Mother Nature’s cues.


Calcium: the Neglected Soil Nutrient

Fertilizers typically come with an “NPK” rating. That stands for Nitrogen, phosphate and potassium. It would seem as if these are the only macronutrients needed for a productive soil, but nothing could be further from the truth. Calcium is, in fact, the bedrock of healthy organic soil.

Few mini farmers have heard of, much less understand, the importance of CEC — cation exchange capacity.

Ions are positively or negatively charged atoms or molecules. Anions (such as chlorine) have a negative charge whereas cations (such as sodium) have a positive charge.

Cation Exchange Capacity, while I won’t get into the chemistry of how it is measured, is a measure of the availability of minerals in the soil to plants. If a soil has low CEC, even high levels of other nutrients may not be readily available for the plants to use. So a high CEC allows for greater growth with lower nutrient requirements.

The primary determinants of CEC are the levels of humus and clay in the soil; as well as the age of the clay present. In some parts of the country, the clay is so old that its CEC is negligible whereas in others, it is quite high. Humus, as a colloid, has a high CEC and it is added in the form of well-aged compost.

Of course, high levels of clay alone, even clay exhibiting a high CEC, won’t do the trick because it can create anaerobic conditions in the soil; which are not conducive to the growth of the aerobic bacteria necessary for nutrient exchange in symbiosis with plant roots.

CEC is generally measured using four cations — calcium, magnesium, potassium and sodium. The ratio of calcium to magnesium in a soil has a large impact on its productivity; and you generally want to aim for a ratio anywhere from 3:1 to 7:1. If you are able to achieve this, you get optimum water-retention in your soil.

My soil is quite acidic. So much so that the water in my dug well has a pH of 4.8. This means that a large part of the CEC of my soil is naturally composed of hydrogen, H+.  When I apply lime to my soil, the calcium replaces the hydrogen. While hydrogen forms acids (such as hydrochloric or sulfuric acid), calcium forms bases, such as calcium carbonate or calcium hydroxide. Thus, adding calcium to the soil in the form of lime can increase CEC, create better water retention and establish better conditions for symbiotic bacteria.

Usually, because my soil is also deficient in magnesium, I apply dolomitic lime; which contains both magnesium and calcium in an appropriate ratio.

I just happen to have a chemistry lab that I can use to test all of this stuff; but some rules of thumb can generally work just fine.

In general, add 2″ of well-aged compost to each raised bed every year. Test your pH and if it is lower than 6.4; correct it by adding enough lime or dolomitic lime to establish that pH. Keep in mind that lime takes months to work; so it is best added in the fall for wintering over.

Feel the Heat!

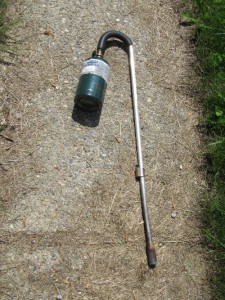
One of my all-time favorite toys is my flame weeder.

Because I allow grass to grow between my beds, and weed-wacking around them can be a pain, I use a flame weeder around the outside edges of my beds where the lawnmower doesn’t reach. It is fast, efficient and really fun to use. It also eliminates weeds without disturbing the soil. When the soil is disturbed new seeds can be brought up that will grow into new weeds.

I also run the flame weeder over the soil in the beds to cook surface-level weeds and weed seeds before planting. This allows the crops planted in the bed to get a good head start so they can shade out any weeds that come next.

The flame weeder is also great for starting trenched branches in the beds for making biochar.

I picked mine up at the local agricultural store for $60 but it has paid for itself in terms of time-savings.

Planting Corn Seedlings Instead of Seeds

Corn is among the most difficult crops to grow on a small scale in the home garden. Put twenty seeds in the ground, five of them fail to sprout, and there is a good week’s difference in germination time between the first and last to emerge. Thus, the early sprouters can sometimes shade out those that sprouted later, creating uneven maturity. On top of this, it is often a long-season crop; which can be a rather iffy proposition here in NH.

I solve this problem by planting out corn as seedlings. That is, I plant the corn indoors in soil blocks a couple of weeks before I would ordinarily plant it outside. This way, the non-germinating seeds aren’t leaving a bare patch in the garden and I can match those seedlings I plant outside by height so that nothing will be inordinately shaded.

By doing this I end up with far superior results on a small scale than could be had by trying to scale-down the methods of industrial agriculture.

Double Your Broccoli

The traditional growing season up here in NH is only from Memorial Day to Veteran’s Day. And, sometimes we get frosts as long as a week after Memorial Day, as we had last year. If you limit yourself to planting broccoli (also cabbage, kale and brussel’s sprouts) only during that time frame, you will end up with only one crop per year. However, unlike tomatoes or cucumbers; these plants are fairly resistant to cold temperatures; so they can be planted out earlier and grown later.

Planting for two harvests is easy enough. Figure out when last frost is in your area; and start your seedlings indoors twelve weeks before hand; and then plant them outside six weeks beforehand. Your first crop will be ready to harvest about mid-season.

Meanwhile, on the date of last frost or a week or so later, start a new batch of seedlings indoors. These will be ready to plant within a week or so of the first crop being harvested. This second crop will be ready a couple of weeks after the first frost and will likely be of higher quality than the first.

Jerusalem Artichokes and the Porcelain God

Because of the prevalence of diabetes, a lot of folks are looking to inulin as an insoluble carbohydrate that adds delicious flavor without boosting blood sugar. That’s because it is indigestible.

Jerusalem artichokes are high in inulin and if boiled and mashed like potatoes they are an excellent and amazingly delicious substitute.

But the first time you do this, you might find yourself seated upon the porcelain deity due to becoming … indisposed.

The inulin in Jerusalem artichokes is indigestible, meaning that when it gets to your lower intestine all hell is going to break loose if you don’t have the bacterial flora in there to deal with it.

Most of us have SOME of those bacteria, but not enough.

Therefore, even though Jerusalem artichokes are incredibly delicious, don’t get carried away! Start off slowly and then make portions bigger gradually as your bacterial flora adjust to adapt. THEN you will be fine!

Peanut Butter and Electric Fences

Deer can get into your mini farm and deal enormous destruction in a short time. Generally, we have good luck by sprinkling some commercial deer repellent along the tree line from whence deer enter. This works well if done before any planting and renewed about six weeks later.

But once the deer have started eating your crops, their allure is so strong that the repellent is nigh upon useless. That’s where the electric fence comes in.

Deer jump high barriers with the greatest of ease in order to get to food. The trick is to do this cheaply, easily and effectively. Use portable stakes to string a single strange of electric fence about 3-1/2 – 4 feet off the ground.  Put some aluminum foil around the wire so that it splays out — and coat it generously with peanut butter.

Mr. and Ms. Deer won’t hurdle that barrier. Instead, they’ll nuzzle right up and get zapped. And the zap leaves a powerful impression that will keep them away from whatever is inside the fence.